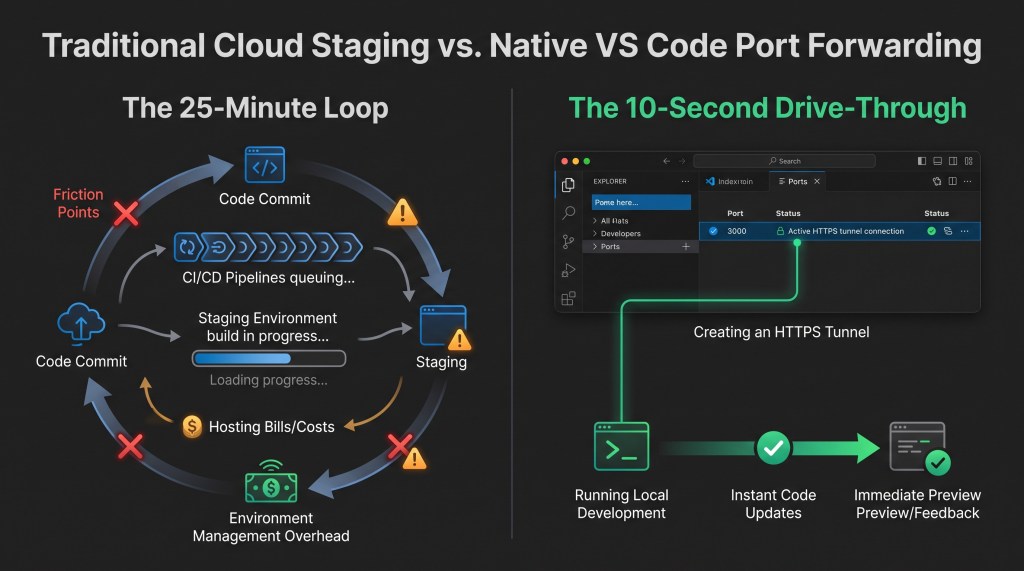
Have you ever found yourself doing the exact same tedious task for the fifth time in a single afternoon? You make a small visual tweak—adjusting button spacing or fixing a typo—and then spend the next twenty minutes waiting. You wait for files to upload, wait for an automated cloud system to process them, and wait for a temporary test website to update, all just so a colleague or client can give a ten-second nod of approval.
While you wait, the clock ticks, your train of thought derails, and your monthly cloud hosting bill quietly climbs higher. What if you could skip the entire waiting room and simply hand someone a private web address that points directly to the live preview on your own screen right now?
That is precisely what the built-in port forwarding feature inside Visual Studio Code accomplishes. It gives you a fast, zero-friction way to collaborate without paying for expensive cloud staging setups or wasting time in upload queues.
1. The Big Idea
To understand how this works, imagine you are a baker creating custom specialty cakes in your home kitchen.
In the traditional setup, every time a client wants to taste-test a frosting sample, you have to package it in dry ice, hire an express delivery van, transport it across town to a rented display boutique, and wait for the client to drive over and sample it. It takes hours, costs serious money in rental and courier fees, and disrupts your entire baking schedule.
Port forwarding inside Visual Studio Code is like opening a secure drive-through window right at your kitchen counter. Instead of sending the sample across town, you give your client a private pass to pull up to the window, taste the frosting fresh out of the bowl, and share their thoughts. The moment they are done, you close and latch the window. No delivery vans, no showroom rent, and no lost hours.
Under the hood, your computer runs your project on a specific internal channel (often called a port number). Visual Studio Code creates a secure, temporary bridge from that internal channel to a standard web address. Anyone who clicks that address can view and interact with your work in their own web browser as long as your preview is active.
Why You Will Love It
- Skip the deployment queues: Share in-progress screens instantly without waiting on cloud systems.
- Cut hosting expenses: Stop paying cloud providers for short-lived test environments just to show quick progress.
- Instant feedback loop: Make changes on your computer and let reviewers see them refresh immediately.
- Frictionless viewing: Reviewers do not need to install software, touch settings, or understand technical tools; it opens in any standard browser.
2. Who Is This For?
This built-in convenience is a game-changer for anyone collaborating on web-based projects:
- Project Managers and Team Leaders: Keep daily review cycles moving fast while eliminating the recurring cloud infrastructure costs of running temporary staging servers.
- Designers and User Experience Reviewers: Test how layouts and interactions feel in real time across different devices before approving a layout.
- Freelancers and Client Consultants: Walk clients through live design options on voice or video calls without having to publish early drafts to a public website.
- Busy Coworkers: Get a fast second opinion from a colleague sitting across the globe without asking them to configure and download the entire project on their own machine.
3. Simple Step-by-Step Guide
You do not need to install extra software, download third-party utilities, or enter complex commands. The tool is already inside Visual Studio Code waiting for you.
Step 1: Open Your Bottom Panel
Open your project in Visual Studio Code and start your usual local preview. Look at the bottom area of your screen where tabs like Terminal or Output live. If that bottom area is hidden, you can reveal it using the keyboard shortcut:
- Windows: Press Ctrl + J
- macOS: Press Cmd + J
Step 2: Switch to the Ports Tab
Along the top edge of this bottom panel, look for the tab labeled Ports. Click it, and you will see a clean, empty list ready for your connections.
Step 3: Forward Your Channel
Click the button labeled Forward a Port (or double-click the empty line in the table). Type the number your preview runs on—common examples are 3000, 5173, or 8080—and press Enter on your keyboard.
Step 4: Sign In Securely
If this is your first time using the feature, a brief prompt will ask you to sign in with your GitHub or Microsoft account. This ensures that only authorized accounts can manage your sharing channels.
Step 5: Copy and Share the Address
Once connected, look at the Forwarded Address column. You will see a standard website address starting with https. Hover your mouse over that address, click the small copy icon, and paste it into your meeting chat or email. Your teammate can click that link and instantly browse your work.
Step 6: Choose Between Private and Public
By default, the address is set to Private, meaning only signed-in members of your team can open it. If you want to show it to an external client who does not have an account in your organization, simply right-click the row, select Port Visibility, and choose Public.
4. Everyday Life Hacks and Practical Tips
- Test on Your Actual Smartphone: Instead of guessing how a page looks on mobile screens, copy your forwarded link and open it in your phone’s browser. You can immediately test touch controls, scrolling smoothness, and small-screen layouts.
- Give Each Address a Friendly Label: If your project runs multiple parts at once, right-click the row and select Set Port Label. Giving them clear names like ‘Main Website’ or ‘Customer Portal’ prevents confusion when sharing links with clients.
- Keep Internal Reviews Private: Leave the visibility setting on Private when working with regular teammates. Visual Studio Code will ensure that anyone clicking the link verifies their identity, keeping your early work safe from curious outsiders.
- Close the Window When Done: When your meeting ends, right-click the row and choose Stop Forwarding Port. Closing the connection shuts down the web link immediately, keeping your machine completely secure.
5. The 5 Core Benefits Breakdown
Time Saved
Preparing a preview website on the cloud often takes fifteen to thirty minutes per revision. When you share directly from your workspace, the link is live in less than ten seconds. Over a busy week, that saves hours of unproductive waiting.
Peace of Mind
You never have to worry about accidentally publishing unfinished work or breaking the main company website. Everything stays neatly contained on your personal computer until you are confident it is ready for the world.
Privacy and Safety
This feature works by reaching outward through an encrypted digital tunnel managed directly by Microsoft. You do not need to reconfigure your home Wi-Fi router, open security holes in your company firewall, or expose your local network to threats.
Easy Collaboration
Collaboration often breaks down when reviewers must navigate complicated tools. Because the link opens in ordinary browsers like Chrome, Safari, or Edge, you can send it to executive leaders, marketing teammates, or clients without giving them any technical instructions.
Total Simplicity
Everything lives inside a single panel in the program you already use. There are no secondary services to sign up for, no extra browser extensions to install, and no subscription fees to track.
6. Real-World Scenario: The Afternoon Client Presentation
Marcus works as an independent digital designer crafting custom store layouts for boutique retailers. One Thursday at 2:00 PM, Marcus joined a scheduled video call with a retail client to review a newly drafted checkout flow.
In the past, getting ready for this meeting was a headache. Marcus had to package his files, push them to a paid cloud staging server, and double-check that the online version matched his computer. If the client asked to change a banner headline or swap a background color, Marcus had to apologize, end the screen-share, upload the files again, and email a new link twenty minutes later.
This time, Marcus tried Visual Studio Code’s built-in port forwarding. As the call started, he opened the Ports panel, entered his project channel, set the link to Public, and pasted the secure web address into the video call chat.
The client opened the link on her personal tablet right beside her laptop. As she clicked through the checkout screens, she noted that the order confirmation button looked slightly too small for thumb navigation. Marcus adjusted the button size directly on his computer.
‘Go ahead and refresh your screen,’ Marcus said.
The client tapped refresh on her tablet. The updated button appeared instantly. She smiled, approved the final design on the spot, and wrapped up the call fifteen minutes early. Marcus avoided another round of cloud hosting fees, saved almost an hour of rework, and delivered a polished, professional client experience.
Key Takeaways
- Share live project previews with anyone in seconds directly from Visual Studio Code.
- Eliminate expensive cloud hosting fees by previewing work on your existing hardware instead of remote test servers.
- Save up to thirty minutes per review cycle by bypassing slow upload queues and automated build pipelines.
- Keep your work secure with simple Private or Public access settings.
- Works across all devices, allowing teammates and clients to review pages on desktop, tablet, or mobile browsers.
Have you tried using built-in port forwarding during your client calls or team reviews? Share your favorite workflow tips in the comments below!


Leave a comment