Ever needed a quick and precise way to capture screenshots without installing extra tools? If you’re a web developer or designer, Chrome DevTools has built-in screenshot features that make capturing webpages a breeze.
In this guide, I’ll show you four simple methods to take screenshots directly from Chrome DevTools—whether you need a full-page capture, a specific element, or just the visible portion of a page.
What Makes Chrome DevTools Screenshotting So Useful?
Chrome DevTools is a powerful toolkit for web developers, built right into Google Chrome. Among its many features, it offers versatile screenshot options that go beyond the standard screen capture tools. You can:
✅ Capture the entire webpage (full-page screenshot)
✅ Screenshot only the visible part of the screen
✅ Grab a specific element on the page
✅ Take a screenshot that matches a device’s viewport (perfect for responsive design testing)
These options give you more control over your screenshots, making them great for bug reporting, design feedback, documentation, and testing.
How to Access Screenshot Tools in Chrome DevTools
Before we dive into the methods, here’s how to open the screenshot functionality:
- Open DevTools: Right-click anywhere on a webpage and select Inspect, or use the shortcut:
- Windows/Linux:
Ctrl + Shift + I - Mac:
Cmd + Option + I
- Windows/Linux:
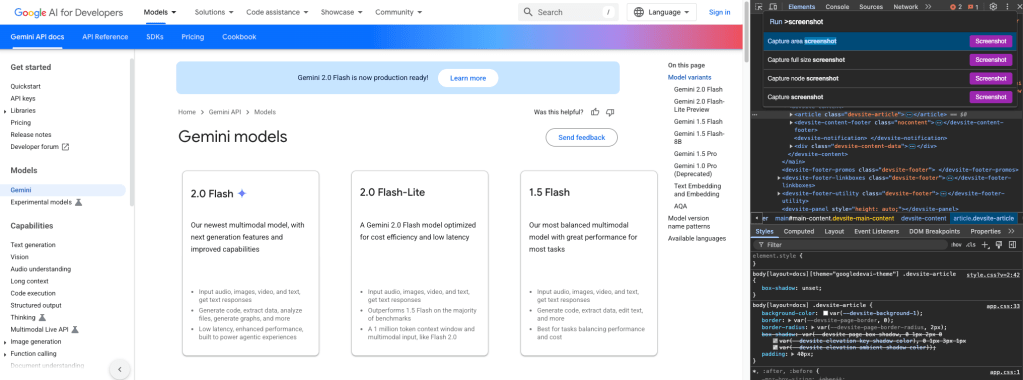
- Open the Command Menu: Press
Ctrl + Shift + P(Windows/Linux) orCmd + Shift + P(Mac). - Type “screenshot” to see all available screenshot commands.
Now, let’s explore the different ways to capture screenshots!
1. Capture an Area Screenshot
Want to grab just a specific part of the webpage? Here’s how:
- Open DevTools and the Command Menu.
- Type “screenshot” and select Capture area screenshot.
- Click and drag over the section you want to capture.
- Release the mouse button, and Chrome will save the screenshot.
2. Capture a Full-Page Screenshot
Need a complete scrollable screenshot of a webpage?
- Open DevTools and the Command Menu.
- Type “screenshot” and select Capture full-size screenshot.
- Chrome will automatically scroll through the page and save everything as a single image.
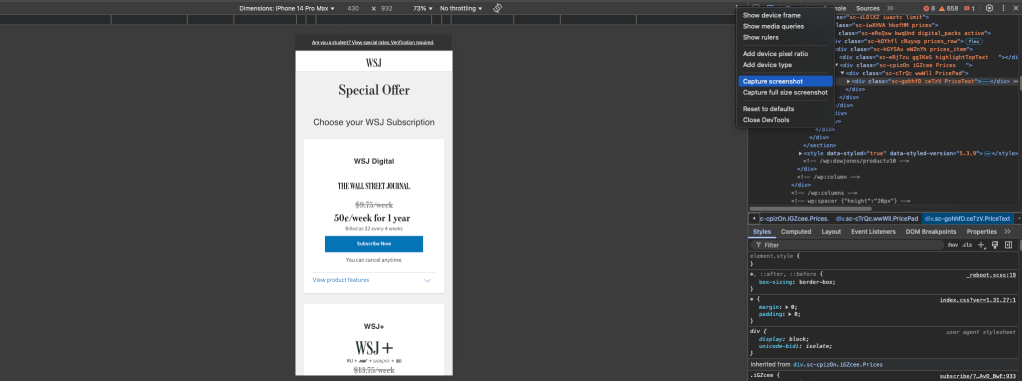
3. Capture a Specific Element Screenshot
If you need a screenshot of a single element (like a button, form, or section), follow these steps:
- Open DevTools and go to the Elements tab.
- Right-click on the HTML element you want to capture.
- Select Capture node screenshot.
- Chrome will save a screenshot of just that element.

4. Capture the Visible Part of the Page
Want to quickly grab only what’s on your screen?
- Open DevTools and the Command Menu.
- Type “screenshot” and select Capture screenshot.
- This will capture only the visible portion of the webpage.
Pro Tips for Better Screenshots
🔹 Test Responsive Designs: Use Device Mode in DevTools to simulate different screen sizes before taking screenshots.
🔹 Organize Your Files: Chrome saves screenshots with default names—rename them right away to keep your workspace tidy.
🔹 Explore Extensions: If you need extra features like annotations or cloud storage, check out Chrome extensions for screenshots.
When to Use These Screenshot Methods
✔ Bug Reporting: Easily highlight issues by capturing relevant sections of a webpage.
✔ Design Feedback: Share full-page or element-specific screenshots with your team.
✔ Documentation & Tutorials: Create step-by-step guides with precise visual references.
✔ Responsive Testing: Ensure your website looks great on different screen sizes.
Chrome DevTools offers a fast and efficient way to capture screenshots without extra software. Whether you’re a developer, designer, or tester, these four methods can help streamline your workflow and save you time.
Try them out and let me know your favorite! 🚀

Leave a comment